
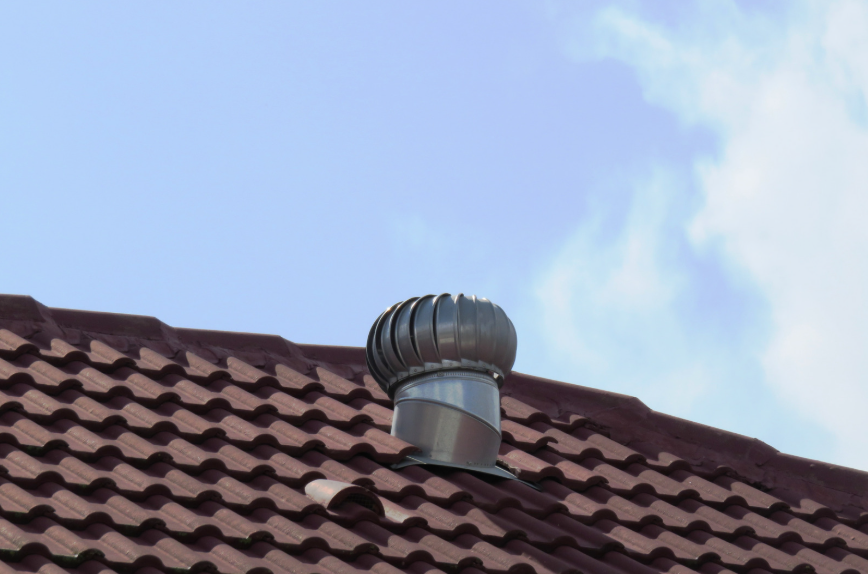
When the air inside your home starts to feel dense and heat builds up under your roof, it’s often not just the weather — it’s the lack of ventilation. Proper air movement in your ceiling cavity can make a meaningful difference to indoor comfort, especially during prolonged periods of warm weather. One option that’s gained traction in Australian roofing is whirlybird installation, which helps passively release hot air trapped in the roof cavity.
It's a common solution, but not always a straightforward one. I’ve had one installed myself, and while I noticed a drop in ceiling heat, the outcome largely depended on factors I hadn’t considered beforehand, like roof slope, internal airflow, and even shading. If you’re weighing up the pros and cons, there are a few practical things to understand first. The key is looking beyond the spinning turbine and thinking holistically about how air moves through — and out of — your home.
Factors that impact ventilation effectiveness
There’s this assumption that whirlybirds just "fix" hot roofs. But really, they don’t. Not by themselves. I learned that the hard way after helping a mate fit one to his tile roof — he thought it’d solve everything. It didn’t.
What matters more than the spinning vent is what’s around it:
- If your roof's got no pitch, air doesn’t rise properly
- If you’ve got no eaves or intake vents, there’s nothing drawing air through
- Shade helps too — no shade, more heat load
- Larger homes usually need more than one vent
- Even the roof colour and insulation play a part
The thing is, ventilation only works if there’s airflow. Without that, you’re basically just putting a hole in the roof and hoping for the best. It took a few trial-and-error installations in different properties before I really understood this.
Why passive strategies are often more reliable
There’s something to be said for working with nature instead of against it. Fans, air con, mechanical extractors — they all help, sure. But they’re reactive. Passive systems, on the other hand, set the conditions before the heat even builds up.
Looking into passive cooling techniques, I came across a few concepts that just made sense. Things like shading, strategic window placement, and controlling how air moves through the home — all low-effort, high-impact ideas.
It’s not just about staying cool either. It’s about avoiding that overnight heat lag — when the sun’s long gone, but the house still feels like an oven once you start layering passive tools — insulation, roof ventilation, airflow — the results kind of build on each other.
I tried out some of those changes in an older rental I was living in — swapped dark curtains for light-reflecting blinds, cleared vents, added reflective foil. It wasn’t flashy, but the rooms were definitely less stifling by late afternoon.
Planning ventilation for hotter regions
If you live somewhere hot, it’s not just the afternoons that get you. It’s how long that heat sticks around. I’ve been in houses where the walls felt warm into the night — and it wasn’t just bad insulation. It was the roof, soaking up heat all day, slowly releasing it downwards.
So when I came across some roofing tips for hot climates, a few things clicked. Simple stuff, like using light-coloured paint or reflective roof sheets. Also, adding vents where airflow actually happens, not just where it looks balanced.
- Light roofs deflect way more heat than dark ones
- Eave vents are often forgotten, but they are super effective
- Air gaps make insulation work harder
- Sarking under metal roofs adds a solid buffer
That last one? Game changer. I helped fit sarking to an old tin shed that used to be roasted by midday. Afterwards? Still warm, but bearable. The difference came from small upgrades layered together, not one big solution.
What to know before installing roof vents
Installing a roof vent sounds easy — and mostly, it is. But it’s also easy to do wrong. I’ve seen plenty of whirlybirds stuck in weird spots or installed without even checking airflow paths. No surprise when they don’t help much.
Few points to keep in mind:
- Know the roof layout — air moves differently in gabled vs. hip roofs
- Don’t skip on intake — that’s what makes exhaust work
- Not all whirlybirds are equal — cheap ones rust or stick
- The vent should align with where the hot air pools
- Consider materials — metal roofs behave differently from tiled ones
Before I had one installed on my last place, I skimmed through a metal roof preparation guide — more out of curiosity than anything. Glad I did. It mentioned sealing overlaps and checking underlayment — two things I wouldn’t have asked about otherwise.
The installer actually paused when I brought it up. Said most people don’t even know what sarking is. It’s those small, overlooked parts that end up mattering down the line.
Final thoughts
Keeping a house cool isn’t about one big fix — it’s more like stacking wins. A whirlybird installation isn’t magic, but it’s useful when done in the right setup. Paired with decent airflow, insulation, and a bit of shading, it becomes part of a smarter system — one that does the job quietly, without costing you in the long run.
I've lived in homes where everything felt like a patch job — box fans in windows, blackout curtains taped to the frames. Nothing worked long-term because the structure was fighting itself. But once I started making small, permanent changes — airflow paths, reflective surfaces, passive draws — the whole space felt calmer. Less forced.